Virtual Terminal Supplement: How to Use Integration
Supplement to Virtual Terminal Handbook: How Integrated Use Works in the Context of Particular Rossware Applications
By way of advance explanation, this document explains how integrated use of the Virtual Terminal (VT) works within Rossware applications. There is a separate guide that describes how to use the VT specifically:
https://help.rossware.com/docs/other/misc/virtual-terminal-handbook
And still another that describes particulars about the RosswarePay system
https://help.rossware.com/docs/other/rosswarepay/
Also potentially relevant is the section ServiceDesk's main manual that describes the subject of FundsControl generally:
https://help.rossware.com/docs/main/job-management/tracking-funds
Using the Virtual Terminal in ServiceDesk, Generally
The primary context in ServiceDesk where the new Virtual Terminal is invoked is from the FundsJournal form (Ctrl+F9), when creating a new item entry of “Bankcard” type.
As always from that form, you can create a new entry by going directly there, clicking on the “Add New Item” button, and appropriately filling in the boxes.
However, that method is very seldom used.
Much more typically, you arrive at essentially the same place via other methods, such as:
In the FinishedForms POS context, you're collecting money from the customer and so click on the “Receive Funds” button, which takes you to the same context as just described, but with a couple of the boxes appropriately advance-filled-in for you.
In a PVR Type-II process, you've clicked in the “Funds Collected” box, with a result similar to what's described in #1.
From an actual JobRecord (F7), you click on the “enter funds Rcvd” button, again with a similar result.
In all such contexts, you find yourself at the top of the FundsJournal form with a simple row of editing boxes. The first is pre-filled with Invoice Number, and second with Customer Name. The third and fourth are blank, and ServiceDesk has you pre-positioned in the first of these latter two, where it expects an indication of money type.
This is all as per normal, and has been the structure for a long time.
So far, nothing has changed. Just as always, you'll type a simple letter to indicate money type (e.g., “c” for cash, “b” for bankcard, etc.), then ServiceDesk tabs you to the next (fourth) box, where you type in the amount. With all four boxes now filled in, you hit 'Enter' on your keyboard to save.
That is now the magic point where, with this new addition, it's time to be excited. At this point (i.e., of hitting “Enter” to save, and assuming you've indicated it's a “b” for bankcard transaction), the Virtual Terminal will appear.
At such point, you can simply swipe a card (assuming you've equipped your computer with a swiper), or manually fill-in card number and other data,* then run the transaction. After you do so, Esc from (or otherwise close) the form. ServiceDesk will now appropriately “toggle” the underlying FundsJournal entry to show the transaction has run (i.e., will add the applicable reference number).
It's just that simple. And, please note you'll automatically find yourself in this appropriate context based on having easily transited there from any of the above-described operational contexts (i.e., POS, Type-II PVR or entering funds directly from a JobRecord).
What could be nicer than that? There are two added contexts via which you can display the Virtual Terminal:
Suppose, for whatever reason, you end up with bankcard entries in the FundsJournal that have not yet been run.* In the preceding chapter we mentioned how, if you right-click on any such entry (this is while in the View/Edit Items ? Bankcard ? Receipts ? Undeposited/Unverified display mode), you'll get an option to “Toggle” the item, if not previously toggled, as having been run. We didn't mention the same options list now includes another choice, as follows: So, if you happen to have any bankcard entries already in the FundsJournal on which the transaction needs to be run, just right-click, and make the appropriate choice. It's that easy.
If for any situation you want to bring up the Virtual Terminal to run a transaction—but do not want to integrate the results into any ServiceDesk process, you can raise the form directly by hitting Shift+F9 on your keyboard (or, you can click in the MainMenu under 'Work-in progress').
How to Create and and Use “Stored-Card-Information” in ServiceDesk
When using the expression “stored-card-information,” we mean a system that allows you to obtain complete card information from a customer just once, and to store it, so you can use it at will to run transactions going forward.
More particularly, we mean a system that stores the information in an encrypted online (and PCI-compliant) vault. This vault denies any and all from any direct access to the information. Access is only allowed via a “token” that is provided, and even then information is passed solely to allow completion of a transaction, and is never exposed to outside eyes or outside software. Because this system uses a token to securely access the information in conducting a transaction, the process is sometimes referred to as “tokenization.”
There are presently two contexts in ServiceDesk where you may create and attach tokens.
First, you may collect and attach a token to any QuickEntryTemplate (QET). Once a token is attached to a QET, you may then run a transaction against that token whenever the respective QET client is the paying party on a job.
Second, you may collect and attach a token to any regular customer via a JobRecord that is setup for that customer.
We'll describe the QET context first, and then describe how it's done in the regular-customer/JobRecord context.
For Token Use as Connected to QETs:
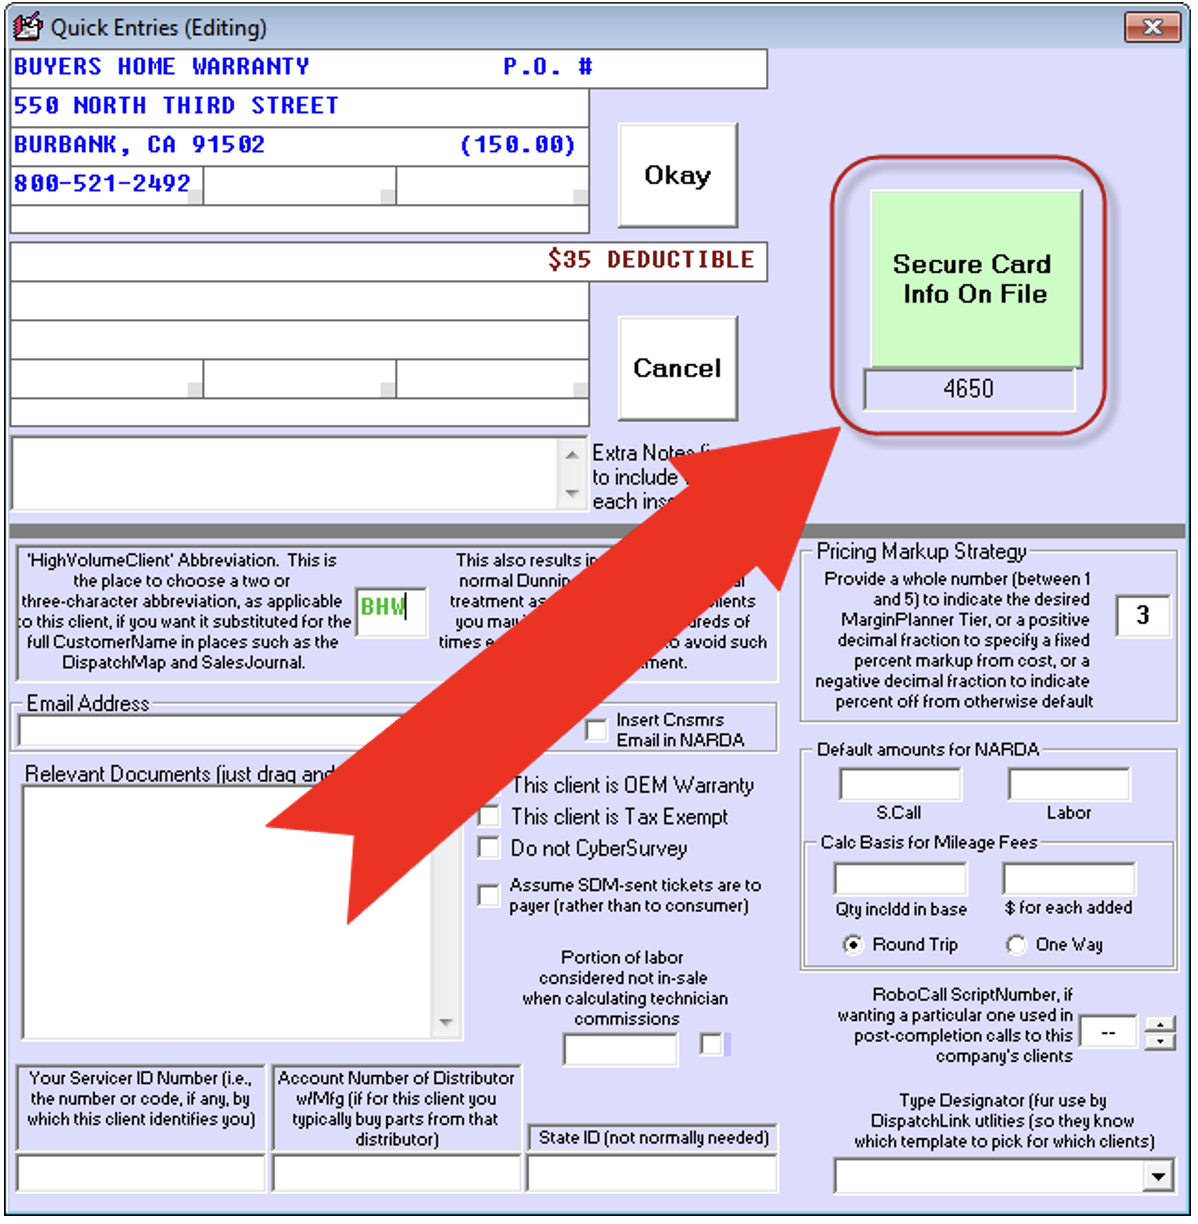
From any QET’s editing interface (Alt-F1 > select-QET-of-interest > click-
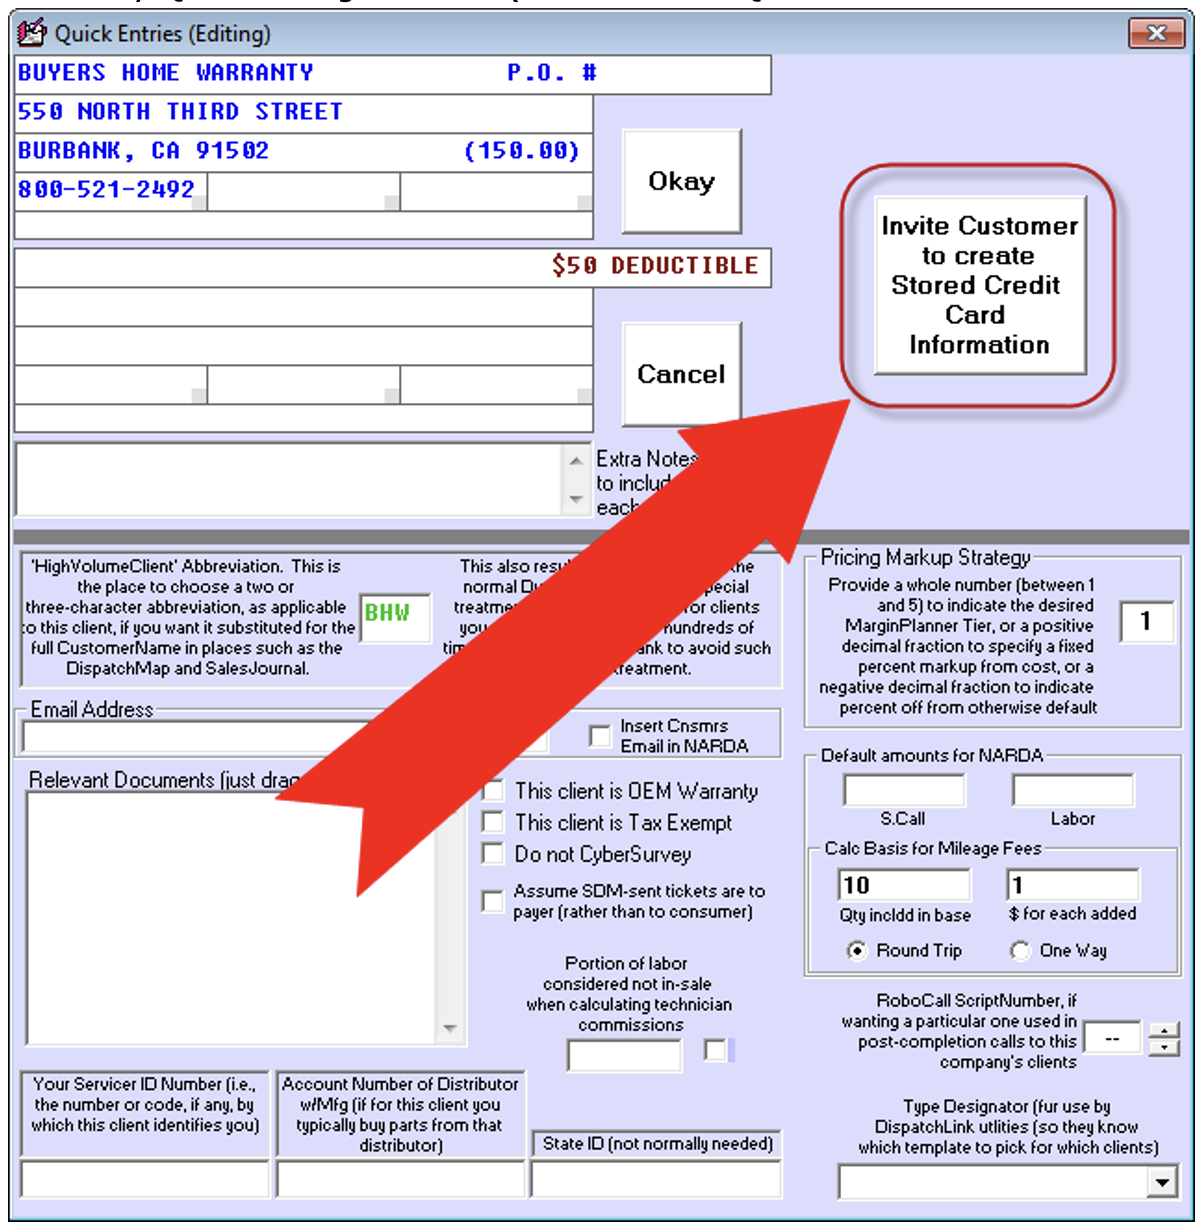
As its title indicates, you may click on the button to create an invitation to the entity that is represented in the QET. You'll be asked if you wish to email or text-message the invitation, and will be prompted to provide an email address or mobile telephone number accordingly. You'll then be presented with an email or text-messaging edit-before-sending interface. It will have pre-filled text, which you may edit if desired, then send. Depending on the type of communication picked, the recipient will receive something similar to this:
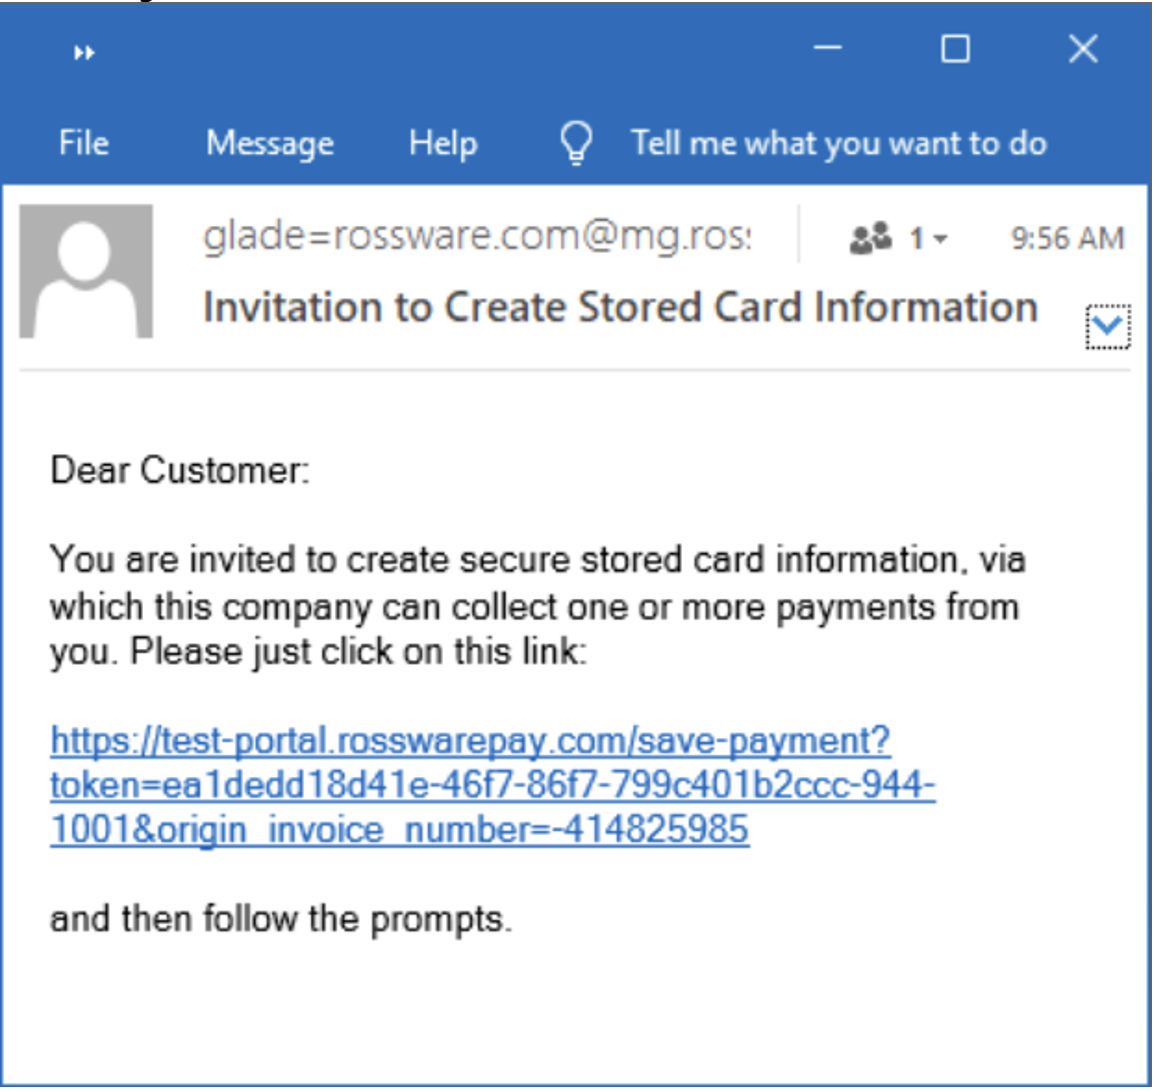
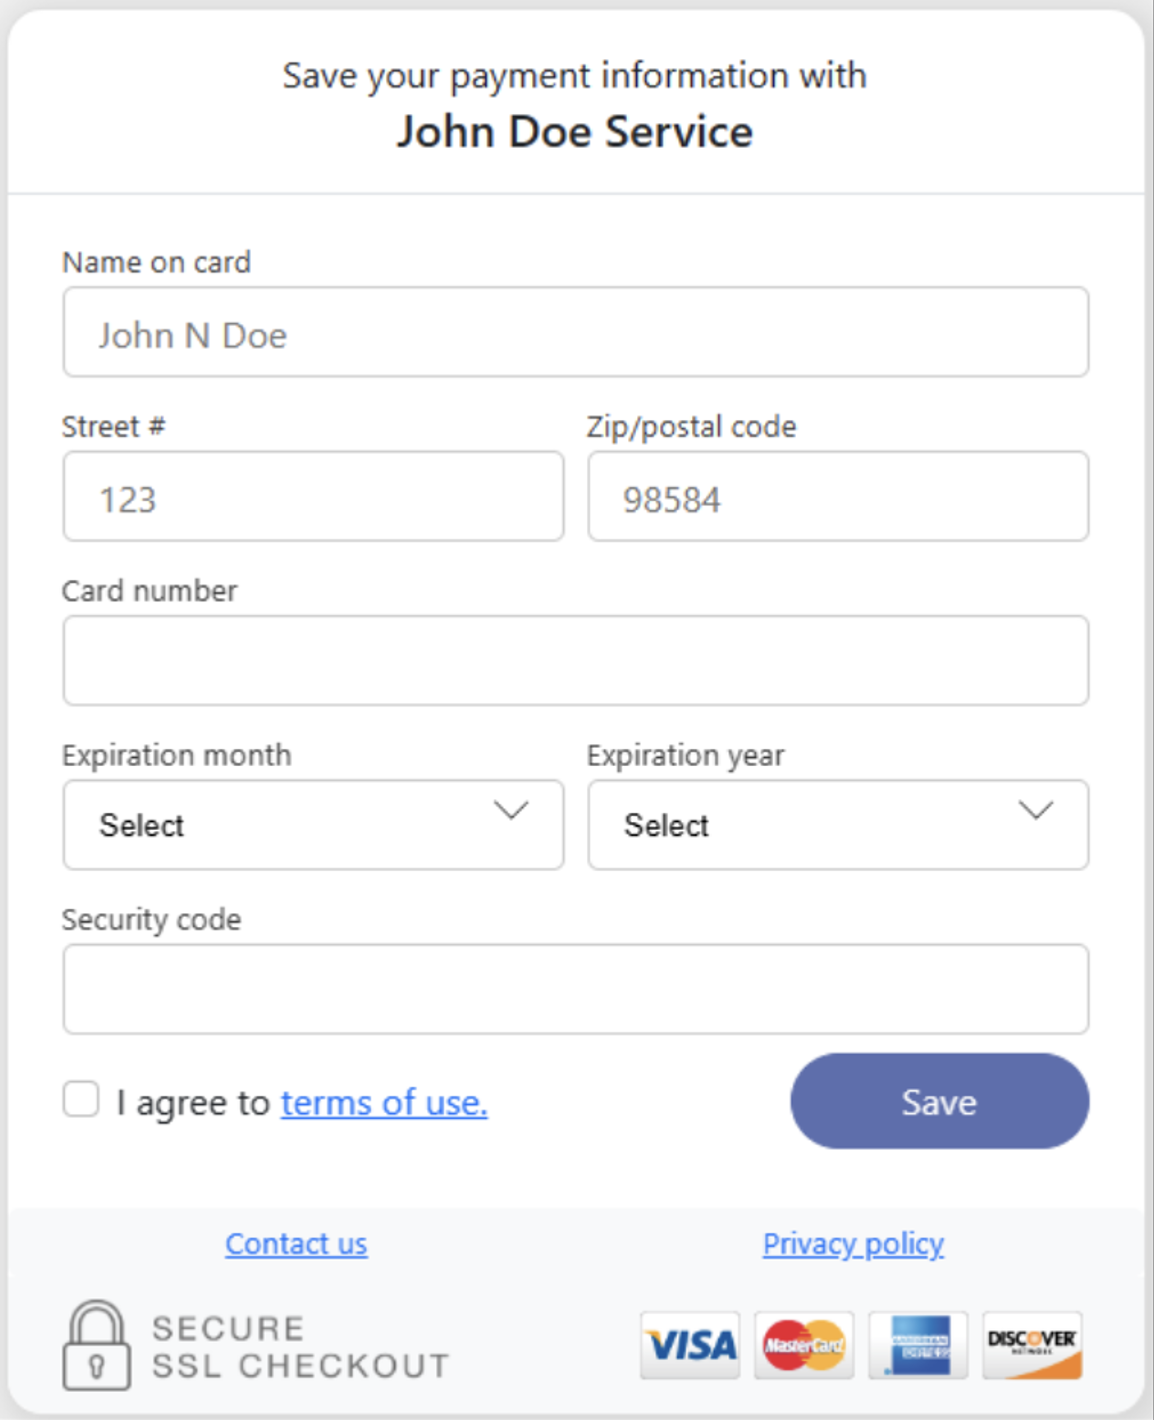
If the link is clicked on, the recipient will see a web interface similar to this:
In the meantime, that button in the QET edit interface will have changed to look similar to this:
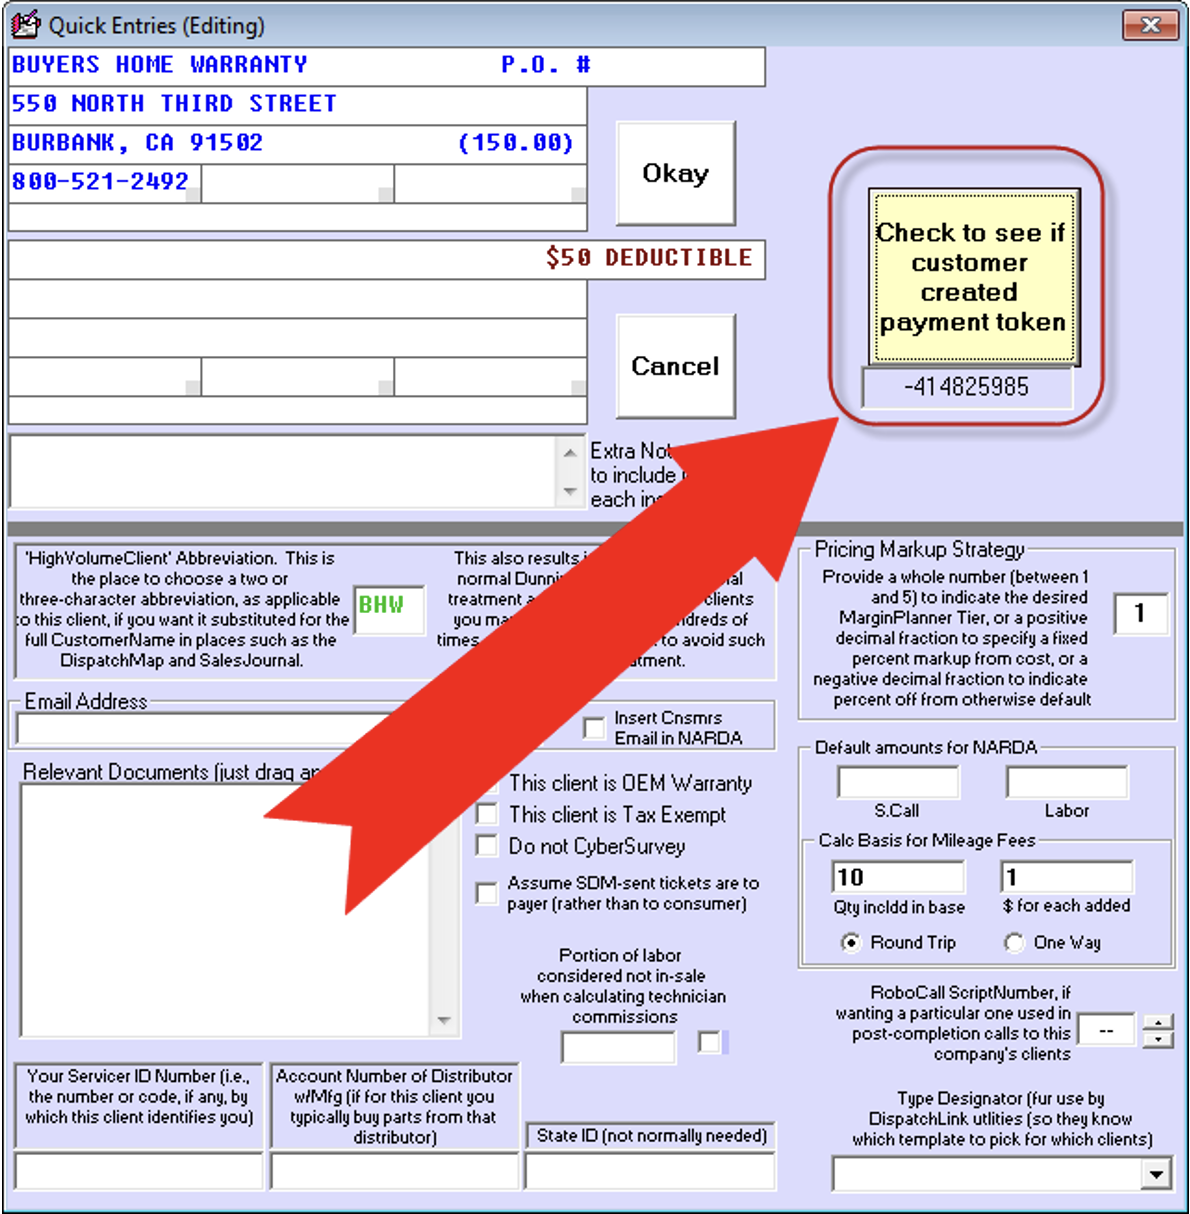
As you can see, besides the change in color, the button now indicates you can check to see if your customer completed the token-creation process. If you click to check and your customer has not done so, a dialog will so inform. If you click to check and the customer has done so, you’ll see a dialog that happily so informs, and the interface will change to look similar to this:
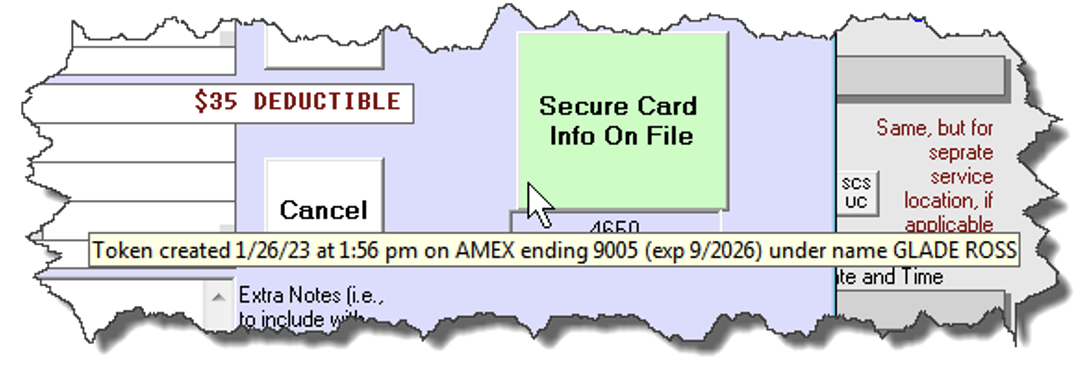
And, if you float your mousepointer over the button, you'll see non-sensitive info regarding the stored card:
Most importantly, when you go to run a bankcard transaction connected with a JobRecord that has this QET client setup as the paying party, your VT is going to fill-in like this:
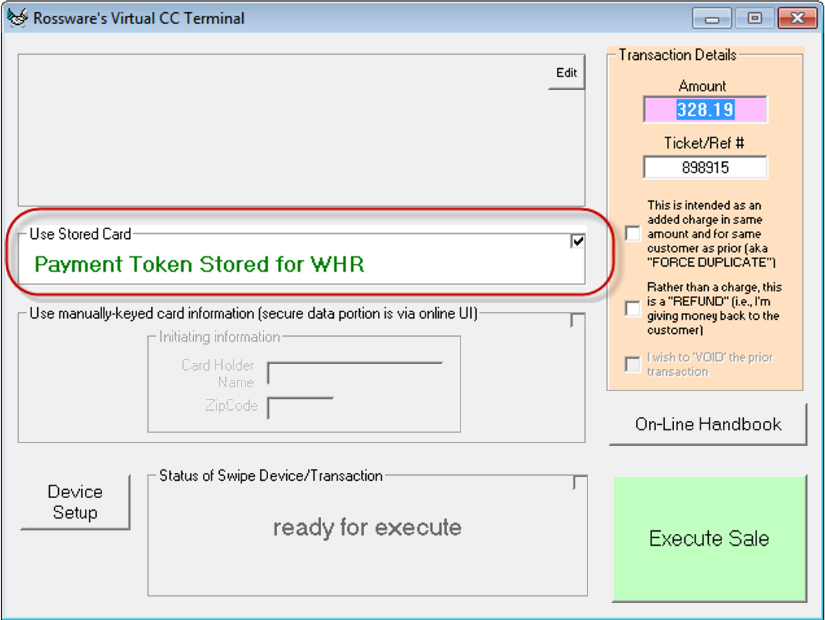
As per expectation, you can go ahead and run the charge against the stored/secure information, and without anyone ever having access to its sensitive information.
Also, please note this is another place where you may float your mousepointer over for a ToolTip that informs of the non-sensitive elements in the card that stored:
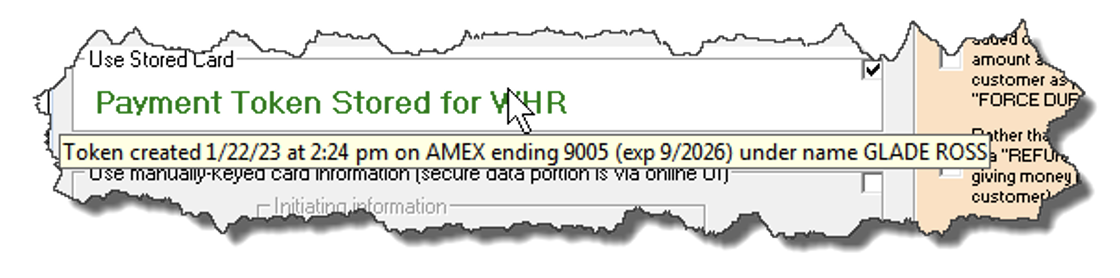
This allows you to verify, before running a transaction, that it will indeed be against the card that you expect it to be against.
For Token Use as Connect to Regular Customers via a JobRecord:
This is quite simple. Just right-click in any JobRecord (F7) on its “enter funds Rcvd” button. This brings up the dialog that presents a list of funds-related alternate options:
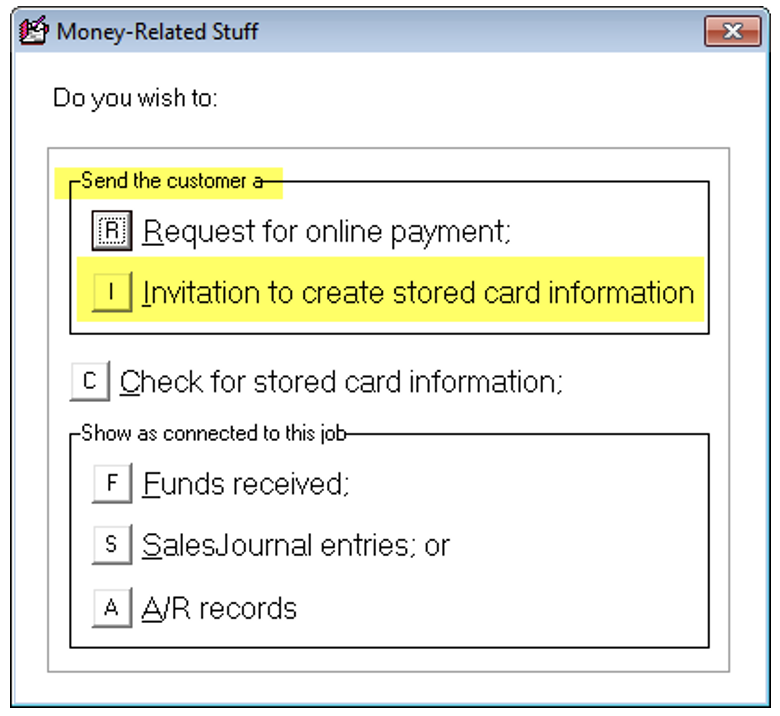
(Highlighting is added to emphasize the selection of current interest.)
Obviously, you may select the option that's above highlighted to create an invitation, which works very much like in the QET situation . . . except here the system will look in the JobRecord for email or text-message send-to targets, and offer to auto-insert those for you.
From this or any other JobRecord that's associated with the same customer, you may (at any time that's wanted) click on the option that's highlighted below to see if a token has been created by the customer:
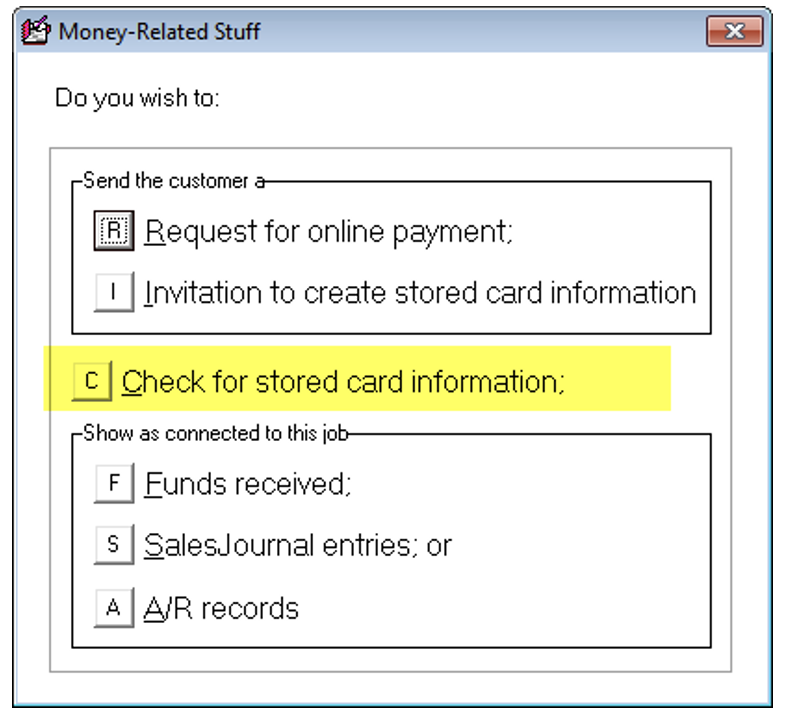
Such a click will bring up a dialog that tells you if a token exists for the customer.
If a token exists, it will be offered in the VT when you go to run a charge on any job in which the same party is setup as they payer (i.e., very much the same as in the QET scenario). In other words, the system will find the token, and offer that as basis in the VT to run a charge.
An important matter to understand is how the system associates other JobRecords for the same customer with the JobRecord that was used to send an invitation and create a token. The answer is, when looking for an applicable token from any JobRecord, ServiceDesk looks in your entire database for any and every JobRecord in which there are at least two matches on the name, street address, telephone number and/or email address fields. It then looks for a token that applies to any of those JobRecords. If a token is found, it offers it for use on the current JobRecord. In this way you may collect a token once on a particular JobRecord, and use it (so long as the customer consents, of course) on all subsequent jobs for the same customer.
Going forward, we plan to offer token creation in other contexts, but this is the present structure as of early February 2023
Virtual Terminal in SD-Mobile
Though it's a bit different in the Android and iOS versions as compared to the Windows version (whose VT is exactly the same in ServiceDesk), all versions of SD-Mobile are equipped with a beautiful VT, and usage is quite obvious.
SD-Mobile VTs have the same capacity to use stored card information, to enter card info manually, or to use any among a multiplicity of card-reading devices. Information concerning all completed transactions feeds automatically and perfectly back into ServiceDesk.
Virtual Terminal in SD-RevenueBuilder
Click here to read the SD-RevenueBuilder guide
Manually keying data
As is apparent from descriptions above, our VT give you freedom to stored card info (tokens), to manually key-in data and/or to use card-readers. If you’re manually entering card information, you need to be aware of a simple assist the system provides.
In most cases, you should notice that three added little yellow boxes appear, when you open the keyed-entry window, as follows (or fewer, if on RosswarePay:
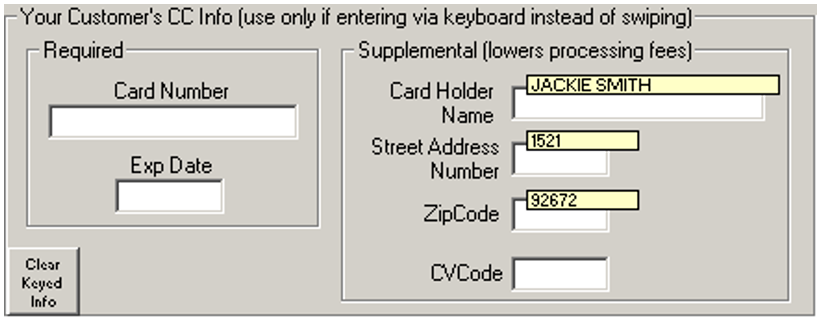
The simple idea is, those little yellow boxes are populated, for you, with customer name, number-for-street-address, and zipcode—as pulled from the underlying JobRecord. The system refrains from automatically inserting this text to applicable boxes—based on the fact the Underlying card may have different credentials than involved in the JobRecord. So, the little yellow boxes serve as a prompt for your operator to ask the customer, for example, "Is the name on the card 'Jackie Smith.'" If the customer answers yes, then your operator should simply click on the little yellow box, at which point Virtual Terminal will insert the provided name to the operable box (otherwise, your operator should simply type the correct name as per normal). Same thing is true in regard to number-for-street-address and zip code boxes.
Quite simply, we're trying to make it as easy as possible to insert the info, while nevertheless prompting your operator to verify its accuracy for the particular card that's involved.
Semi-Automated Reconciliation of Funds
This feature is coming soon!